

Please note that the only procedures supported and maintained by Centreon are those published in the official documentation. If you have a question about this article, post it in the comments.
Using Centreon 21.10 you can now have automatic device and network service discovery using the Nmap utility. This network discovery is based on a new Centreon Plugin and its associated Plugin Pack that triggers the Nmap network scan to discover all the devices, their operating systems and network services on a remote station. The Plugin Pack has a new rule that sends all the results to the Auto-Discovery engine.
This means you can now support your IT monitoring using an open source tool of reference for network administrators, recognized for its ability to identify information system elements (listener ports, services, etc.) and to simplify host discovery by using Nmap as your network scanning tool. Let's see how it works.
What is Nmap?
Nmap is a port scanner designed to detect open ports, identify hosted services, and get information about remote station operating systems. This open source software is widely used by network administrators because auditing Nmap results provides network security data.
It is therefore widely used for network discovery and security audits. Using an IP exchange and packet analysis, it can be used to determine active machines on a network as well as the operating systems and the applications being run. This tool is continuously upgraded thanks to its extensive community that has been active since 1997. This is why Centreon decided to include it to help Centreon platform administrators simplify their device monitoring set up .
What’s in the Nmap Discovery Pack?
Nmap scan results are lists of attributes that are translated into configuration models for the operating system or for network services, for example. The Discovery Pack is a monitoring pack that only contains a Discovery Provider. The Nmap Discovery Pack can be used to run scans of an IP range on demand, and return a list of active objects and their monitoring-related structuring properties such as:
-
The manufacturer, operating system,
-
Open ports,
-
Services,
-
etc.
You are free to customize your mappers using this information to add monitoring models, assign a resource to a group or even create them on the fly.
How is this discovery provider different from the others?
Unlike highly targeted discovery providers such as Azure or VMWare, the Nmap provider is more general and guarantees that users won’t miss any IPs in the targeted subnets. This nevertheless requires a manual result analysis to apply the most relevant monitoring Pack. There are several ways to monitor a Linux server for example, such as SNMP, SSH or NRPE.
So it’s up to administrators to customize their rule according to their monitoring policy. The good news is that the new advanced attribute features in 21.10 let you do just about anything you want in terms of customization.
Indeed, Nmap discovery benefits from the introduction of new capabilities in the management of new data types returned by the plugins that were released with 21.10. (This is also the case for all Cloud AWS, Azure & GCP Monitoring Packs).
How do you run your first Nmap discovery from Centreon?
To discover your resources, make sure the Nmap CLI Discovery Pack is properly installed. If necessary, install it and make sure you see the icon below in the "Configuration > Plugin Packs > Manager" menu:

Then go to the "Configuration > Host > Discovery" menu and create a new task based on the Nmap Provider:

Press Next. Step 2 consists in defining from which poller (or satellite server or collector) the discovery will be initiated. It is very important that the targeted subnet be accessible from this collector, ideally it should be located within the subnet in question.
Step 3 will define the discovery-related options and those for the command that is run:

The timeout is used to define the command’s maximum run time. Usually, 120 seconds are more than enough for discovery on a network with a /24 mask. You should be aware that scans of larger ranges will only work if the timeout value on this screen is increased as well as in the centreon-gorgone configuration file.
We’ve chosen to block the Nmap command line options to guarantee the operation. This isn’t set in stone and we will probably reactivate these options, either to optimize scans or to allow targeting other ports and services. Provide some feedback on what you would like to be able to do!
Finally, set the main option which defines the network and mask to be used for the IP scan. Here we’re going to scan subnet 10.50.1.0, namely all the IPs between 10.50.1.1 and 10.50.1.255.
Use the following steps to:
-
Customize mappers according to your uses (for example, assign "use manufacturer as a host group" for each discovered element)
-
Choose between automatic and manual analysis (prefer manual analysis when getting started!)
-
Choose when to run the task, (select "immediately” as manual analysis is preferred).
How do you view the returned results?
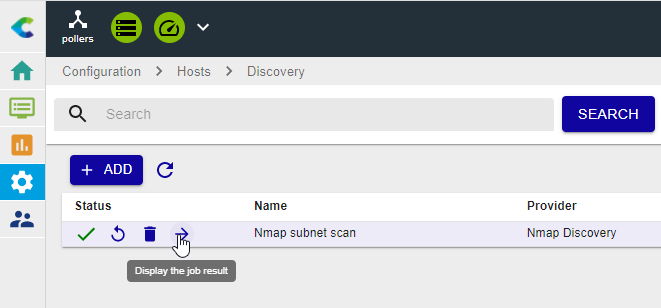
Once the scan is complete (the little green tick confirms this), you can view the results for analysis by clicking on the arrow for the corresponding job:
You can see the associations proposed by the discovery rule and select the ones you want to keep for monitoring:

As you can see from the highlighted line, some elements require manual action to assign the correct template. The small question mark displays the raw discovery result and gives additional information to help you in your choices.
And to go even further ...
To go further, read the Host Discovery module documentation and learn how mappers work so that you can automate your tasks as much as possible.
For example, we can condition the application of the OS-Linux-SNMP-Custom template to a Host only if an available SNMP service is also detected:

It is also possible to make sure that any discovered element identified as being of the Linux type is added to the Linux-Servers group.
This is an example of this type of mapper:

So your real-time filters, visualization and reporting using this dimension are automatically updated. Good news, no?
You can also read more on Centreon 21.10 here. Subscribe to our newsletter and never miss an update.