NtopNG is a network traffic probe that monitors network usage. It is possible to install it on any Linux operating system.
This page describes how to install NtopNG on OracleLinux 8, so as to use it with Centreon 22.04 and the NtopNG widget.
Prerequisites
Hardware
Prerequisites to capture network traffic from 100 Mbps to 1 Gbps:
- CPU : 4 cores
- Memory : 4 Go
- Disk : 100 Go (more information here)
- The server needs two network interfaces:
- One for the management (access to system and NtopNG)
- One for network capture
System
- DNS Server for Internet access (if no proxy) and to resolve name of captured IP addresses
- NTP Server, mandatory to have a "precise" monitoring
- Internet Access for installation and updates
Installation
Update the system before installing NtopNG and its dependencies :
yum update -y
yum upgrade -y
Powertools & REMI repositories
You need the Epel and REMI repositories to install NtopNG.
To activate epel :
dnf install https://dl.fedoraproject.org/pub/epel/epel-release-latest-8.noarch.rpm
Then for REMI :
rpm -ivh http://rpms.remirepo.net/enterprise/remi-release-8.rpm
yum install dnf-plugins-core
dnf config-manager --set-enabled ol8_codeready_builder
dnf config-manager --set-enabled remi
Stop SELinux and firewalld
To stop SELinux, open /etc/selinux/config:
vi /etc/selinux/configReplace :
SELINUX=enforcingBy :
SELINUX=disabledThen reboot your system:
rebootStop and disable the firewall:
systemctl disable firewalld
systemctl stop firewalld
Configure the monitoring interface
The server has several interfaces: you must define which one will be used to listen to the network traffic. Here is an example:
    # ip addr

    1: lo: <LOOPBACK,UP,LOWER_UP> mtu 65536 qdisc noqueue state UNKNOWN group default qlen 1000

        link/loopback 00:00:00:00:00:00 brd 00:00:00:00:00:00

        inet 127.0.0.1/8 scope host lo

            valid_lft forever preferred_lft forever

        inet6 ::1/128 scope host

            valid_lft forever preferred_lft forever

    2: enp0s20f0u3: <BROADCAST,MULTICAST,UP,LOWER_UP> mtu 1500 qdisc fq_codel state UP group default qlen 1000

        link/ether 00:e0:4c:20:d1:15 brd ff:ff:ff:ff:ff:ff

        inet 192.168.1.29/20 brd 192.168.15.255 scope global dynamic noprefixroute enp0s20f0u3

            valid_lft 613961sec preferred_lft 613961sec

        inet6 fe80::4f2f:401a:ec02:7e91/64 scope link noprefixroute

            valid_lft forever preferred_lft forever

    3: eno1: <BROADCAST,MULTICAST,UP,LOWER_UP> mtu 1500 qdisc fq_codel state UP group default qlen 1000

        link/ether f4:4d:30:6f:f7:e8 brd ff:ff:ff:ff:ff:ff

    4: wlp58s0: <BROADCAST,MULTICAST> mtu 1500 qdisc noop state DOWN group default qlen 1000

        link/ether 2e:61:d1:70:34:12 brd ff:ff:ff:ff:ff:ff
We have 4 interfaces:
- lo: Loopback
- enp0s20f0u3: USB interface, used for management for this appliance
- eno1: Physical interface
- wlp58s0: Wifi
On the interface you have chosen as a capture interface, activate the "promiscuous" mode:
ip link set ${CAPTURE_INTERFACE} promisc onSo, in our example, for the interface eno1:
ip link set eno1 promisc onTo activate that at boot, you have to add this command to the file /etc/rc.d/rc.local :
ip link set eno1 promisc onYou need to activate rc-local to load this file:
vi /etc/systemd/system/rc-local.serviceAdd :
oUnit]
Description=/etc/rc.local Compatibility
ConditionPathExists=/etc/rc.local


sService]
Type=forking
ExecStart=/etc/rc.local start
TimeoutSec=0
StandardOutput=tty
RemainAfterExit=yes
SysVStartPriority=99


[Install]
WantedBy=multi-user.target
Then modify rights to execute /etc/rc.local:
chmod +x /etc/rc.localActivate the service:
systemctl enable rc-localThen restart the server to verify that the interface is in promiscuous mode with the command ip addr:
3: eno1: <BROADCAST,MULTICAST,**PROMISC**,UP,LOWER_UP> mtu 1500 qdisc fq_codel state UP group default qlen 1000

    link/ether f4:4d:30:6f:f7:e8 brd ff:ff:ff:ff:ff:ff
Install NtopNG
We will use the official repository to install NtopNG. The official documentation is here.
cd /etc/yum.repos.d/
wget https://packages.ntop.org/centos-stable/ntop.repo -O ntop.repo
We need to be sure that zeromq3 is not present. Apache is not needed and should be removed if you plan to use another port than TCP/3000 to connect to NtopNG :
yum erase zeromq3
yum erase httpd
yum clean all
Then install NtopNG :
yum install pfring-dkms n2disk nprobe ntopng cento
NtopNG Configuration
Monitoring interface
You need to add the name of the interface used to monitor your network to file /etc/ntopng/ntopng.conf:
vi /etc/ntopng/ntopng.conf Uncomment the line with the -i option and add the name of the promiscuous interface:
-i=eno1For performance reasons, add your local networks in the configuration file /etc/ntopng/ntopng.conf. All other network addresses with be considered as remote by NtopNG:
-m="192.168.1.0/24,192.168.2.0/24"Then activate and start NtopNG:
systemctl start ntopng
systemctl enable ntopng
Customize the port for the graphical interface (optional)
By default, we connect to NtopNG’s graphical interface through TCP/3000. This can be changed in the file /etc/ntopng/ntopng.conf:
vi /etc/ntopng/ntopng.confUncomment the option -w and set the port you want to use (in this example, we will use port 80) :
#-w=3000
-w=80
Then restart NtopNG :
systemctl restart ntopngCheck that the port that you have set is used by the process ntopng (here, port 80):
# netstat -anp | grep 0.0.0.0:80
tcp        0      0 0.0.0.0:80              0.0.0.0:*               LISTEN      2413/ntopng
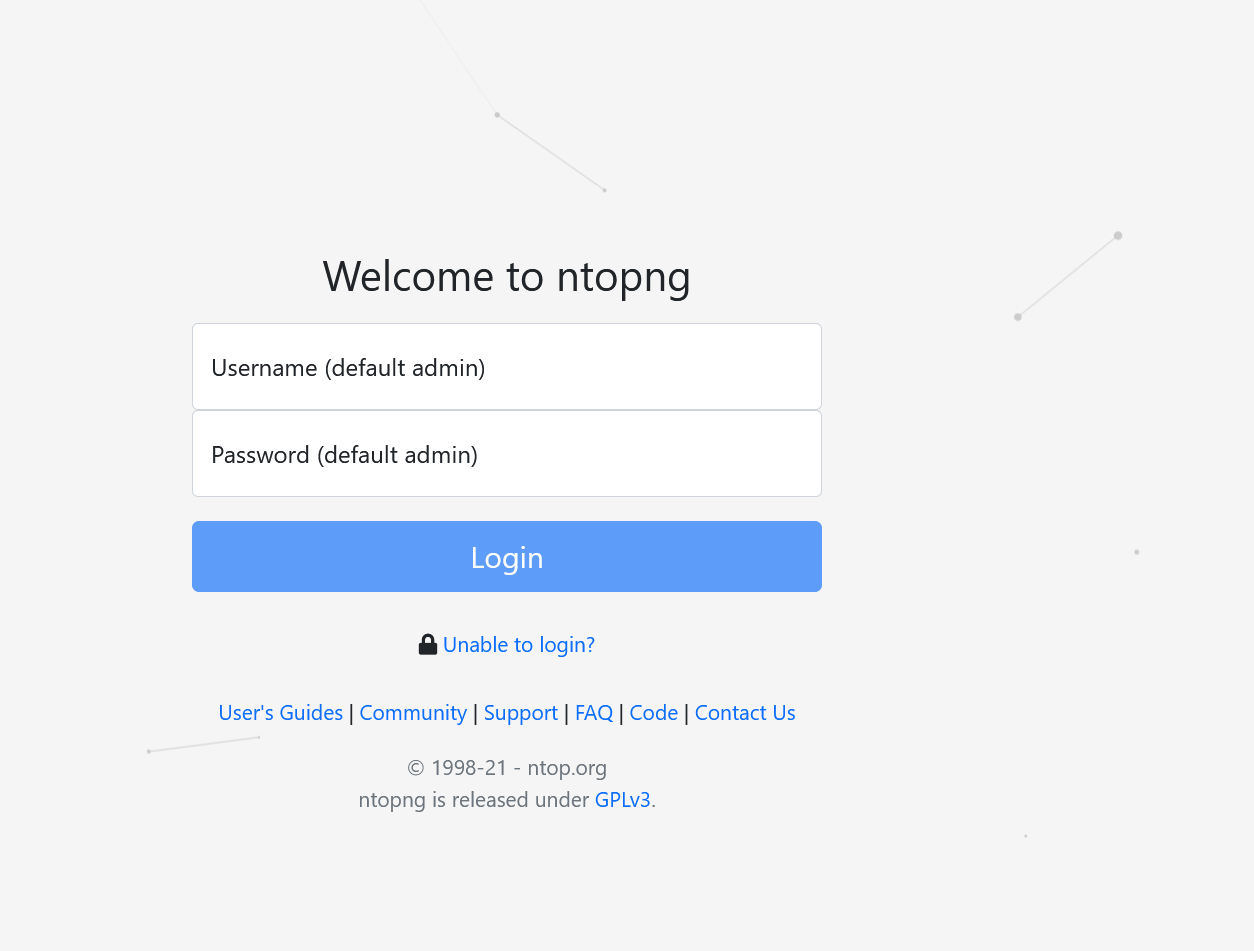
Connect to the graphical interface
Connect to the Management IP, on port TCP/3000 if you didn't change the default port.
For instance, if your server’s IP address is 192.168.1.29, connect to:
http://192.168.1.29:3000/Then connect with the account admin and the password admin:
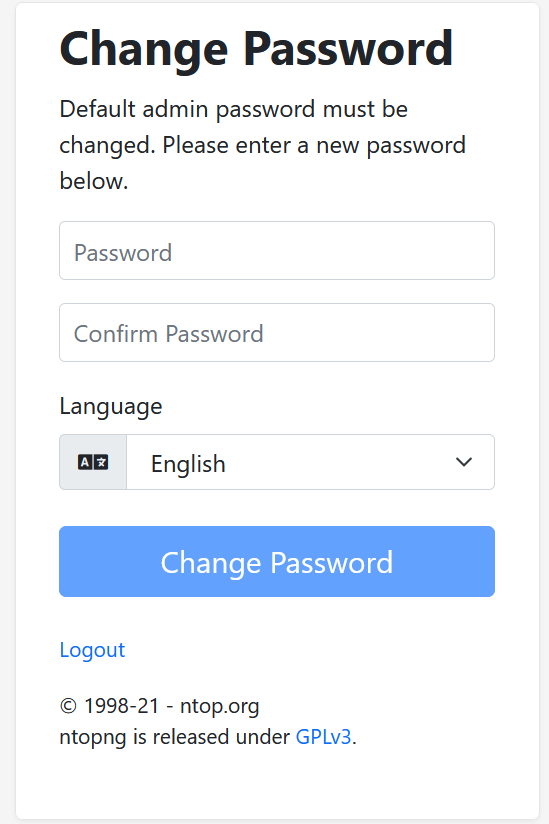
You will have to change the password at the first connection :
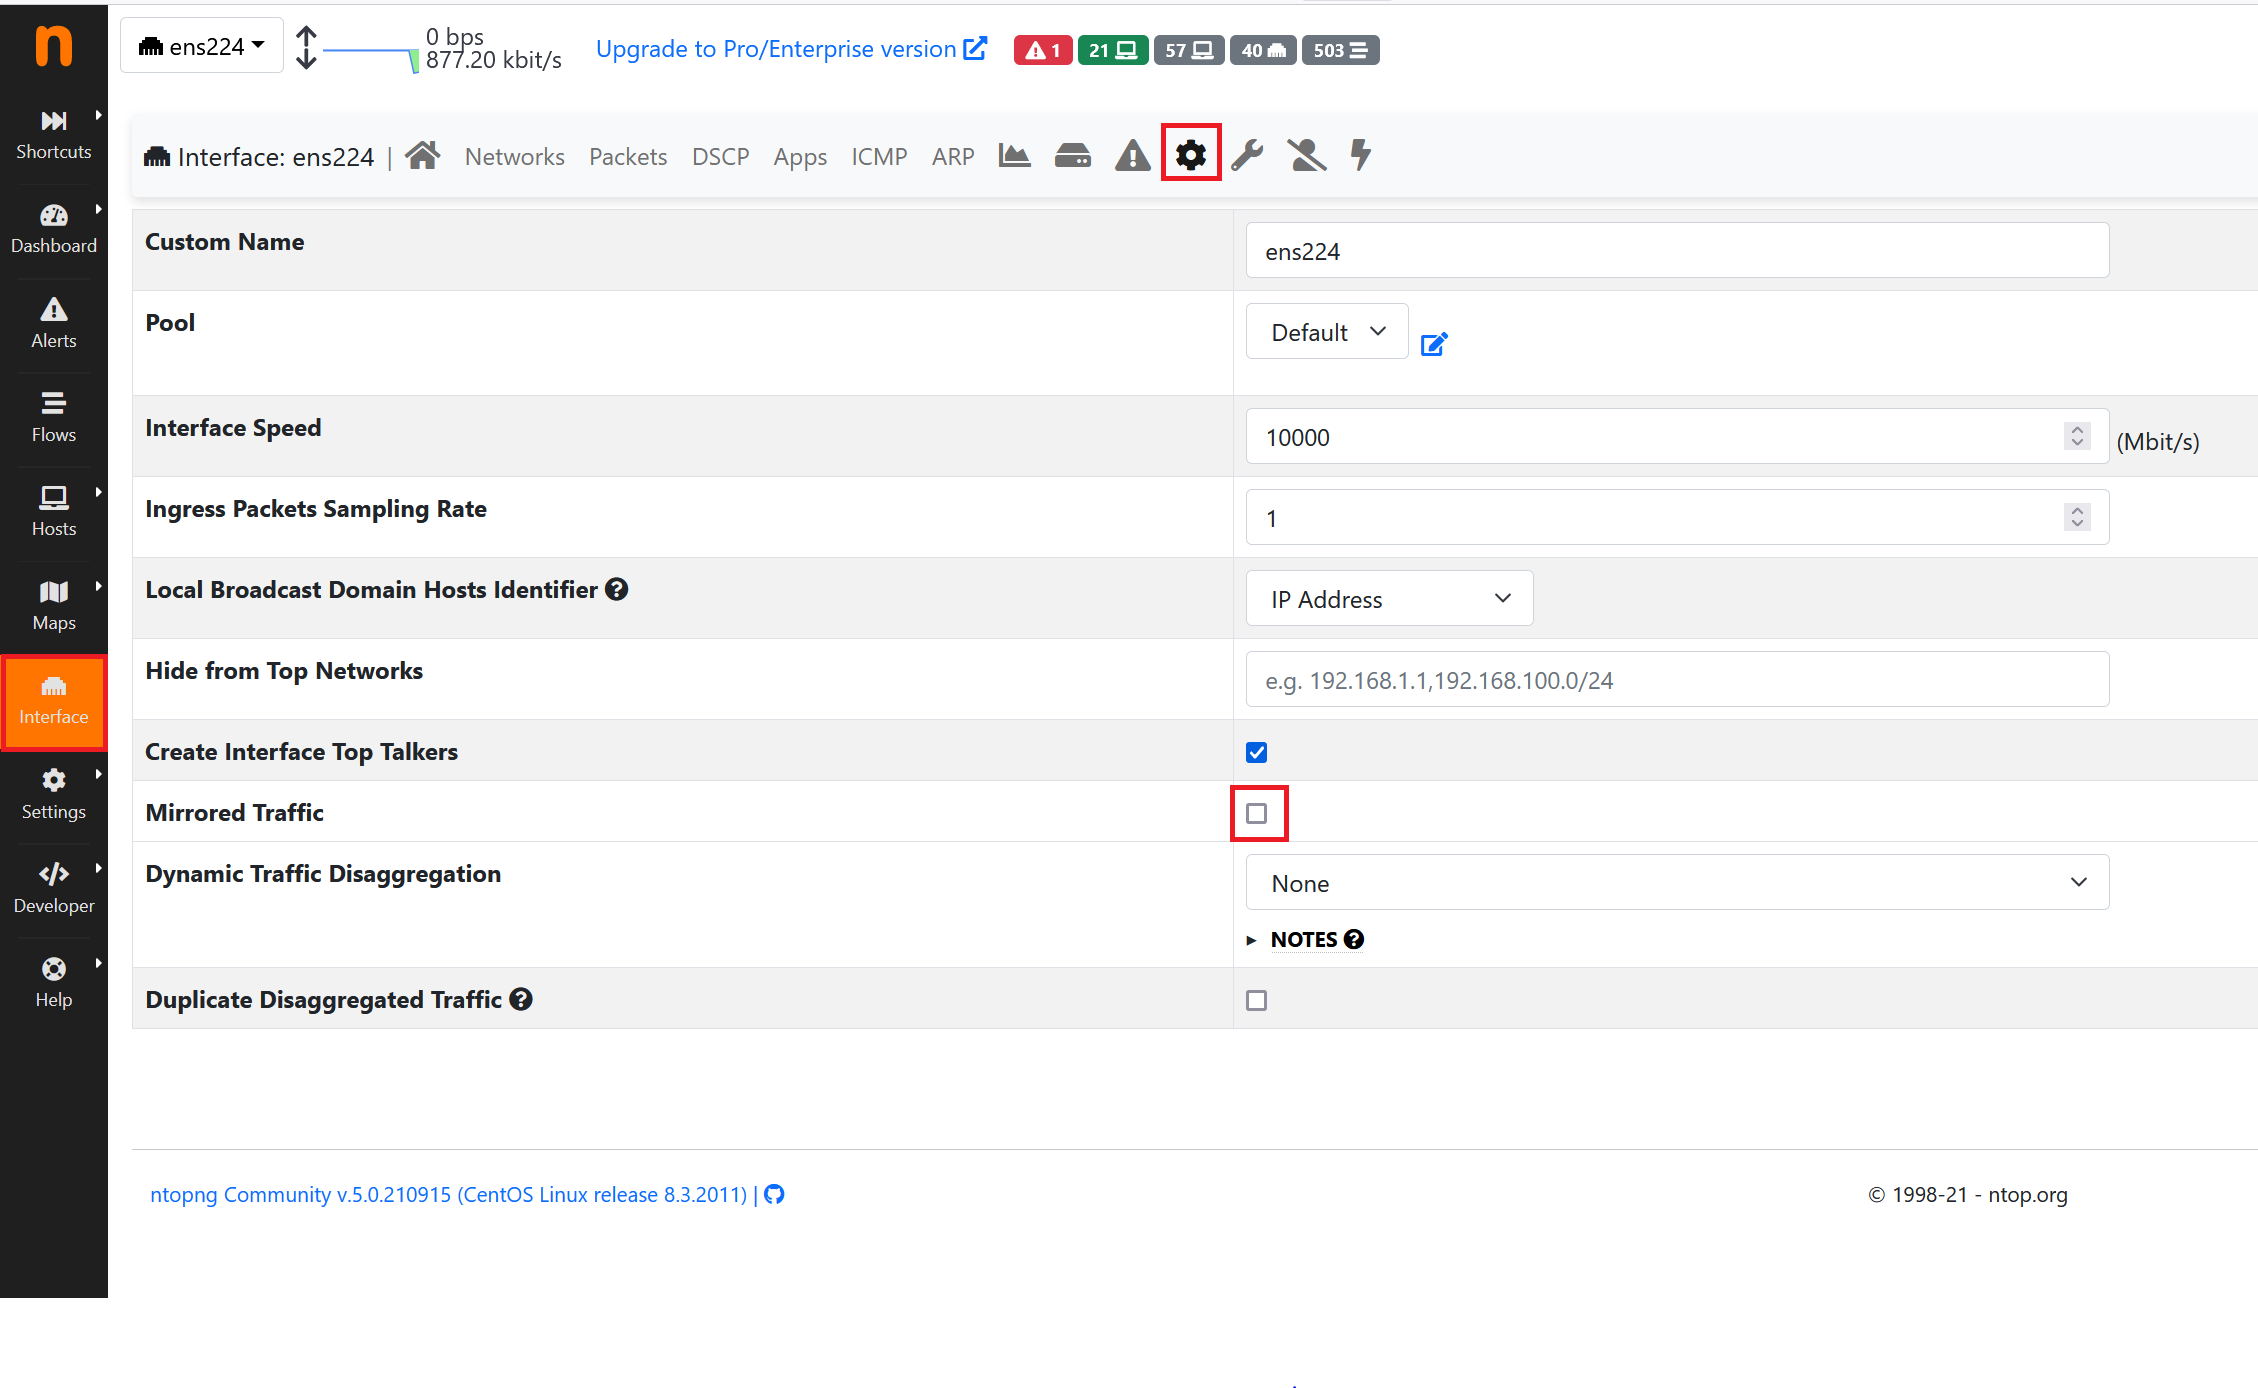
Additional configuration for the monitoring interface
You need to declare that your monitoring interface receives traffic from a mirrored port. On page Interface, in the Settings section, check Mirrored Traffic:
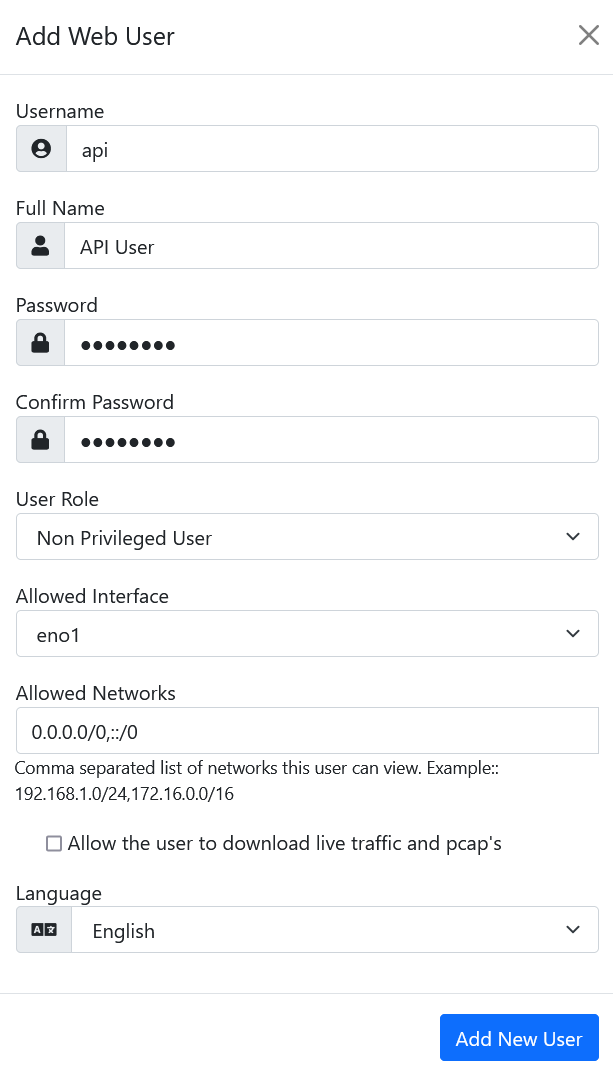
Create an API account
The Centreon widget uses an API account to get metrics from NtopNG. We don't recommend that you use an admin account for this action: create a dedicated account.
To create the account, go to Settings > Users and then click on +:
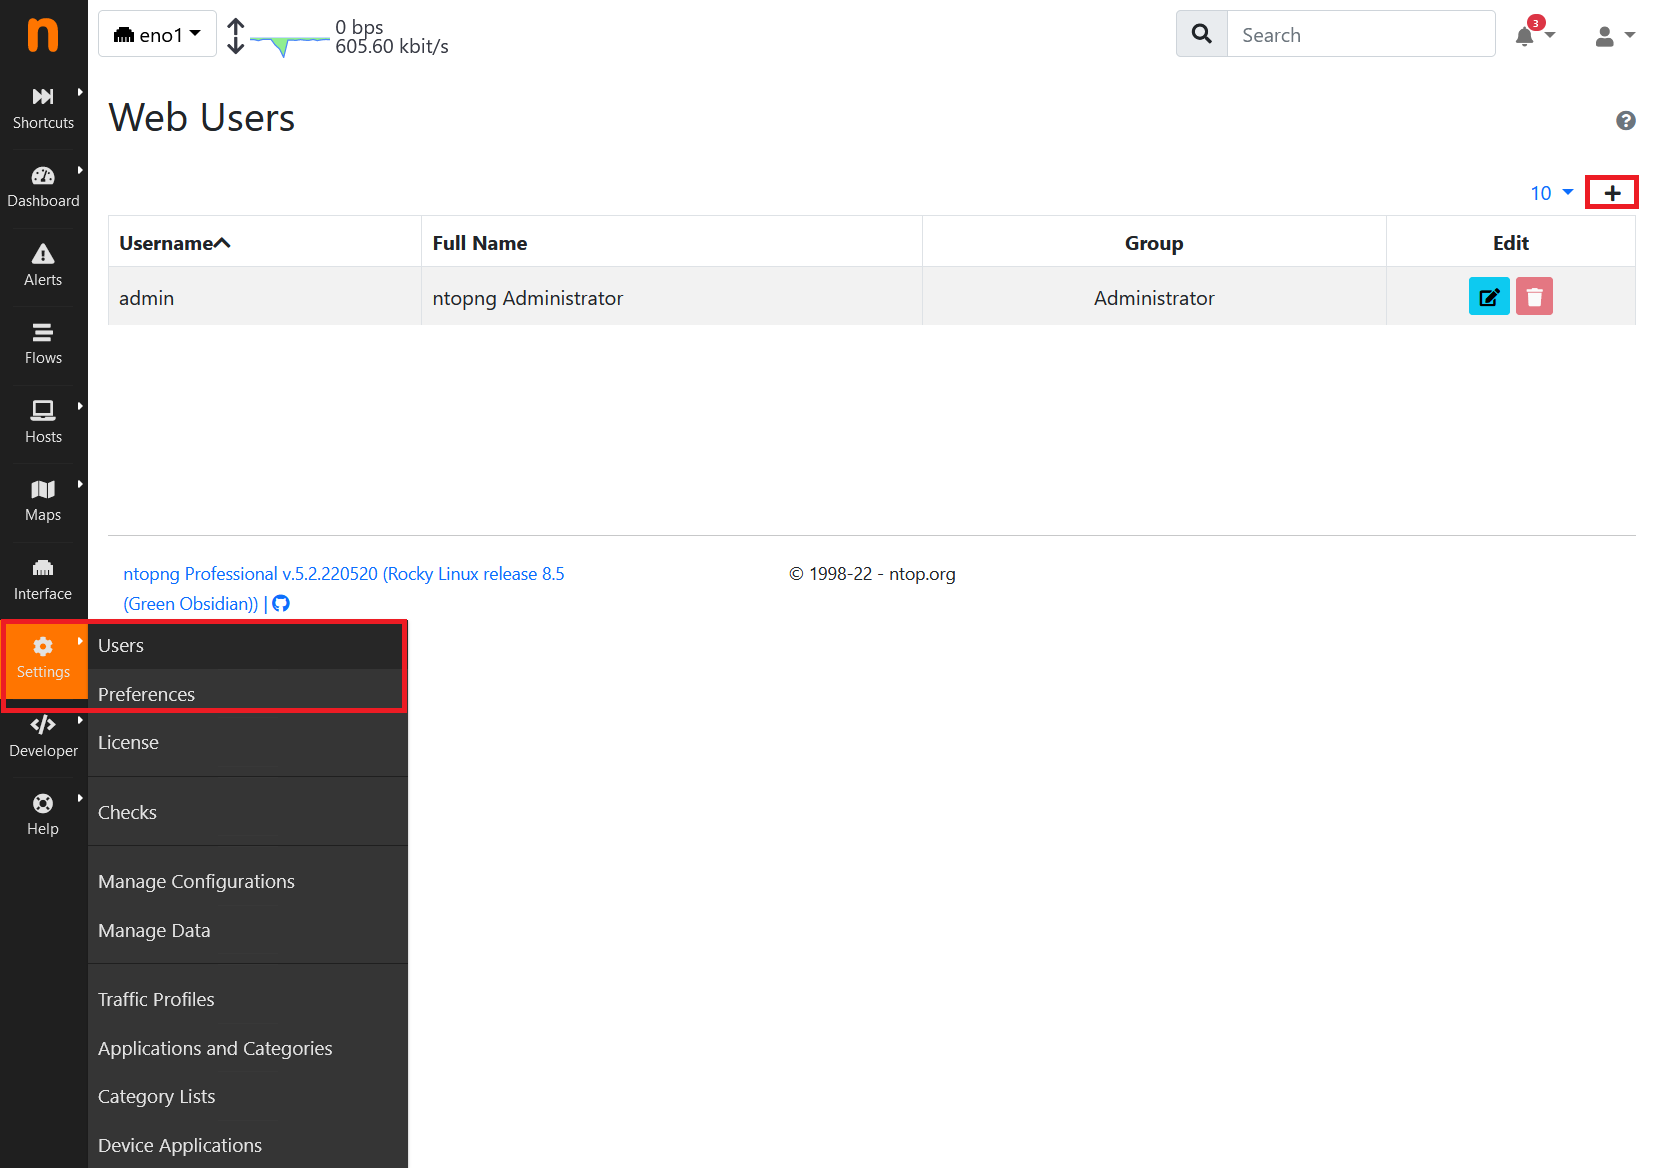
Just add a Non privileged User: