


Please note that the only procedures supported and maintained by Centreon are those published in the official documentation. If you have a question about this article, post it in the comments.
Introduction
Sometimes we need to monitor a remote device using a particular SNMP OID. In this article, we will see how to do it with Centreon plugins and how to configure it into Centreon Web. We will study 2 use cases on a Linux server:
-
Check the current kernel version
-
Check the number of network interfaces
Generally, when we decide to monitor a specific device (industrial machinery, security network device, and many others) it is necessary to know MIB information and to request a specific SNMP OID, but what is it ?
Definition
A MIB or Management Information Base is a formatted text file that resides within the SNMP manager, designed to collect information and organize it into a hierarchical format.
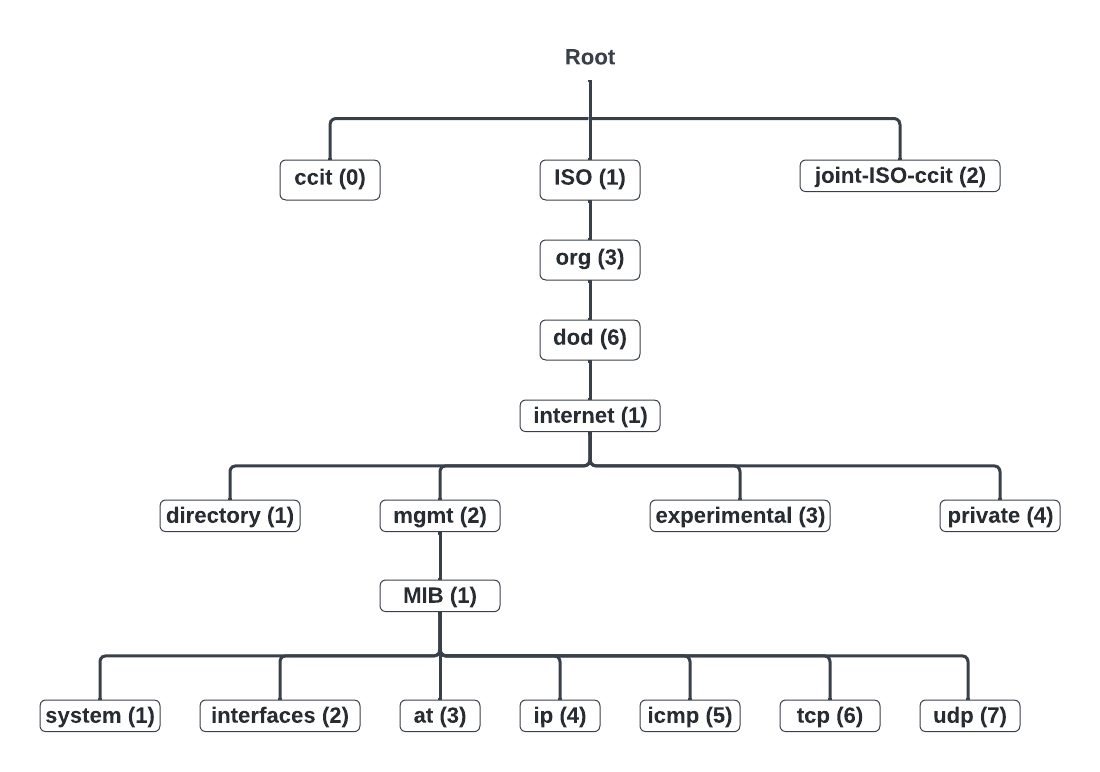
MIB Tree representation
An OID or Object Identifier is an address that is used to differentiate between devices (memory, swap, disk, network interface, etc...) within the MIB hierarchy. The OID is used to refer to unique characteristics and navigate through variables on the connected device. The value of these identifiers varies from text to numbers and counters. There are two main types of Managed Objects:
-
Leaf or Scalar – A single object instance
-
Table or Tabular – Objects with multiple OID results for one OID
Exemple:
- Total swap memory : 1.3.6.1.4.1.2021.4.3
- Network interface description : 1.3.6.1.2.1.2.2.1.2
- Storage description : 1.3.6.1.2.1.25.2.3.1.3
Prerequisites
To monitor this information, make sure the SNMP service on the remote server is up:
[root@ip-10-25-10-249 centos]# systemctl status snmpd
● snmpd.service - Simple Network Management Protocol (SNMP) Daemon.
   Loaded: loaded (/usr/lib/systemd/system/snmpd.service; enabled; vendor preset: disabled)
   Active: active (running) since Wed 2022-02-09 11:59:56 CET; 2 months 21 days ago
 Main PID: 1233 (snmpd)
   CGroup: /system.slice/snmpd.service
           └─1233 /usr/sbin/snmpd -LS0-6d -f
[root@ip-10-25-10-249 centos]#
Then, we need to decide which SNMP OID to use from your MIB. In our case, we will exploit 2 standard OIDs :
| MIB | OID | Definition |
|---|---|---|
| SNMPv2-MIB::sysDescr.0 | 1.3.6.1.2.1.1.1.0 | Get server description |
| IF-MIB::ifNumber.0 | 1.3.6.1.2.1.2.1 | Get network interface number |
Before using Centreon plugins, we’re requesting that the remote device executes the snmpwalk command to get and verify SNMPv2-MIB::sysDescr.0:
[root@ip-10-25-10-249 centos]# snmpwalk -cpublic -v2c 192.168.25.140 1.3.6.1.2.1.1.1.0
SNMPv2-MIB::sysDescr.0 = STRING: Linux ip-10-25-10-249.eu-west-1.compute.internal 3.10.0-1160.31.1.el7.x86_64 #1 SMP Thu Jun 10 13:32:12 UTC 2021 x86_64
and IF-MIB::ifNumber.0:
[root@ip-10-25-10-249 centos]# snmpwalk -cpublic -v2c 192.168.25.140 1.3.6.1.2.1.2.1 IF-MIB::ifNumber.0 = INTEGER: 2
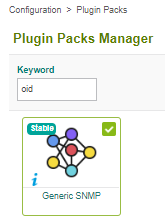
Finally, to complete the prerequisites, download the Plugin Pack available to check any OID. Go to Configuration > Plugin Packs, search for “oid” and download the Generic SNMP pack:
Note :
- Download the RPM package on your Central if it’s not installed : centreon-pack-applications-protocol-snmp
- Follow the monitoring procedure to install required objects
- We will use apps::protocols::snmp::plugin plugin, string-value mode and some regex threshold options
- We’ll adapt the options –oid and –oid-table according to the type of oid : Leaf or Table
How to check the Linux version with an OID
The goal of this check is to verify and guarantee the version required by the system to be up-to-date. We’ll check whether the version is 3.10.0-1160.
Once connected to the server through SSH, we’ll use the command below to monitor the kernel version and configure a critical threshold if the version does not match.
[root@ip-10-25-10-249 centos]# /usr/lib/centreon/plugins//centreon_generic_snmp.pl --plugin=apps::protocols::snmp::plugin --mode=string-value --hostname=192.168.25.140 --snmp-community='public' --snmp-version=2c  --oid='1.3.6.1.2.1.1.1.0' --format-ok='%{details_ok} value(s)' --format-warning='value(s): %{details_warning}' --format-critical='value(s): %{details_critical}' --format-unknown='value(s): %{details_unknown}' --critical-regexp='^(?!.*3.10.0-1160.*$)'

OK: Linux ip-10-25-10-249.eu-west-1.compute.internal 3.10.0-1160.31.1.el7.x86_64 #1 SMP Thu Jun 10 13:32:12 UTC 2021 x86_64 value(s)
Now, if you want to configure this check in Centreon Web, go to Configuration > Services, click on the Add button and fill in the fields like in the picture below.
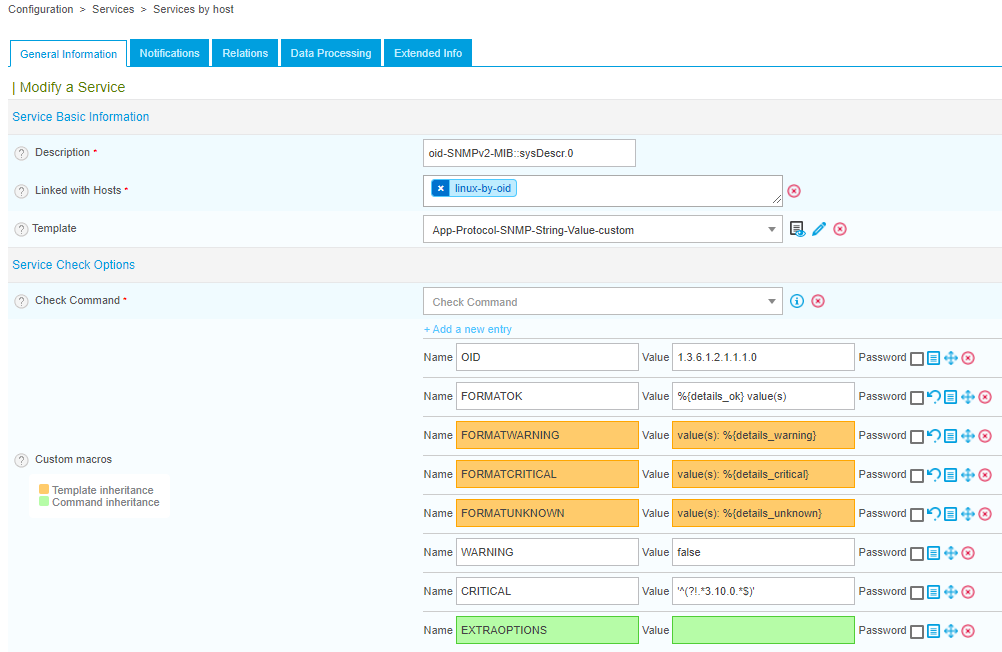
The changes made are listed below:
| Service Name | oid-SNMPv2-MIB::sysDescr.0 |
| Service Template | App-Protocol-SNMP-String-Value-custom |
| OID | 1.3.6.1.2.1.1.1.0 |
| FORMATOK (Macro) | %{details_ok} value(s) |
| WARNING (Macro) | false |
| CRITICAL (Macro) | ^(?!.*3.10.0.*$) |
Note : Don’t forget to export and reload the Poller’s configuration after each modification in the Configuration pages.
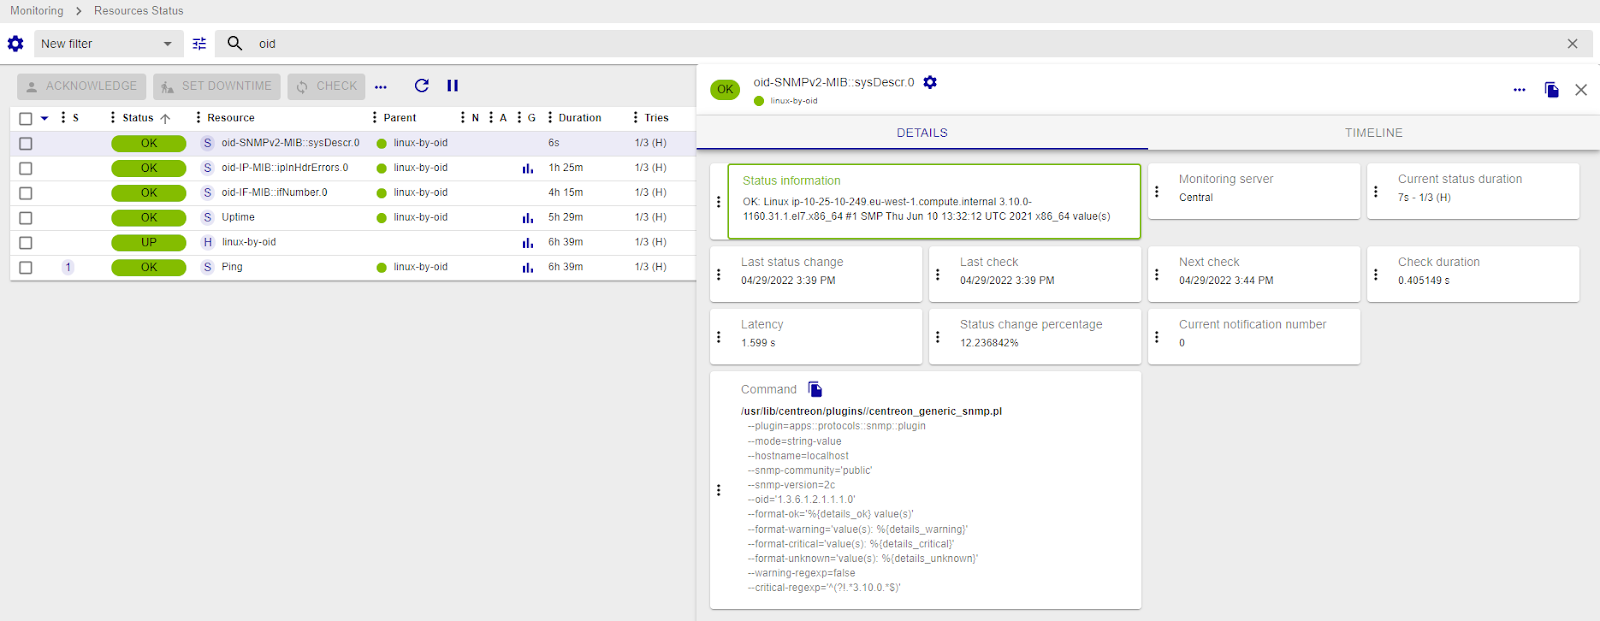
To verify the status in Centreon Web, take a look at your service in the Resources status page.
How to verify the number of network interfaces with an OID table
When we’re connected to the server through SSH, we’ll use the command below to monitor the presence of 2 network interfaces and configure warning and critical thresholds if the total number does not match:
-bash-4.2$ /usr/lib/centreon/plugins//centreon_generic_snmp.pl --plugin=apps::protocols::snmp::plugin --mode=string-value --hostname=192.168.25.140 --snmp-community='public' --snmp-version=2c  --oid='' --format-ok='%{details_ok} value(s)' --format-warning='value(s): %{details_warning}' --format-critical='value(s): %{details_critical}' --format-unknown='value(s): %{details_unknown}' --warning-regexp=’1’ --critical-regexp='0' --oid-table='1.3.6.1.2.1.2.1'

OK: 2 value(s)
Now, if you want to configure this check in Centreon Web, go to Configuration > Services, click on the Add button and fill in the fields like in the picture below.

Custom modifications are listed below:
| Service Name | oid-IF-MIB::ifNumber.0 |
| Service Template | App-Protocol-SNMP-String-Value-custom |
| FORMATOK (Macro) | %{details_ok} value(s) |
| WARNING (Macro) | 1 |
| CRITICAL (Macro) | 0 |
| EXTRAOPTIONS (Macro) | --oid-table='1.3.6.1.2.1.2.1' |
Note : Don’t forget to export and reload the Poller’s configuration after each modification in the Configuration pages.
Once done, you can take a look at your service in the Resources status page.

Here we saw one way to achieve our goal. Thanks to the plugin protocol-snmp and the string-mode, we can easily match OID Leaf or Table to monitor specific resource and match with a warning or critical regex pattern. Feel free to add some examples of your custom use cases to help the whole community. 😉