

Please note that the only procedures supported and maintained by Centreon are those published in the official documentation. If you have a question about this article, post it in the comments.
In this post, I’ll try to give you the big picture of how our discovery engine works.
Of course, it’s not just for fun, the idea behind it is to encourage you to help us to make Nmap and SNMP Discovery providers better and better!
How does it work?
Host Discovery
The discovery capabilities of Centreon relies on three main components:
- The Auto Discovery module
- The Gorgone daemon
- A bunch of discovery capable Pugin Packs and underlying plugins
Basically, you install a Plugin Pack and take advantage of the included Discovery Providers through the Auto Discovery module. The module allows you to configure and schedule jobs and manage their results. Gorgone daemon enables these rules by running discovery plugins on remote pollers and presenting outputs to the module.
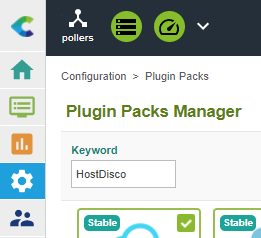
You might not know this but searching for the “HostDisco” keyword will result in a list of all packs shipping a Host Discovery rule.
SNMP discovery
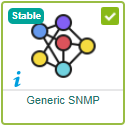
Install the “Generic SNMP” Pack to deploy included Discovery providers. You can do it through the “Configuration > Plugin Packs” menu:
| Note: When using an offline license, you should install the Pack RPM on your Central Server.
|
After that, you can now see two Discovery Providers available when adding a new Discovery job through the “Configuration > Hosts > Discovery” menu:

Those jobs have their parameters because they deal with different SNMP versions, but the global mechanism is the same. They both rely on a discovery plugin mode:
Without going too deep into the code, it’s important to understand that SNMP discovery looks for two OIDs values:
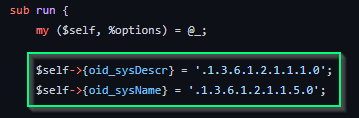
The sysName OID provides the hostname while the sysDescr gives further information on the device itself (manufacturer, type, kernel, and depending on its kind).
Depending on the sysDescr value, the plugin will try to map the discovered device with a type (spoiler alert: this is where we will need you).
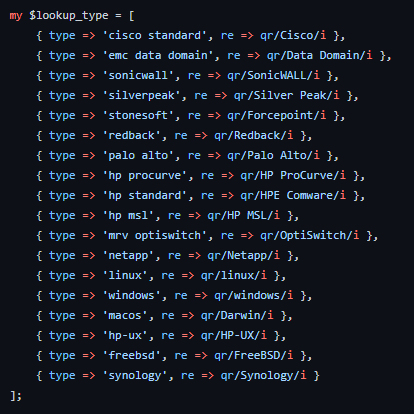
This mapping happens through a dedicated file.
On the left, you have the value the plugin will return when the sysDescr value matches the regular expression defined on the right.
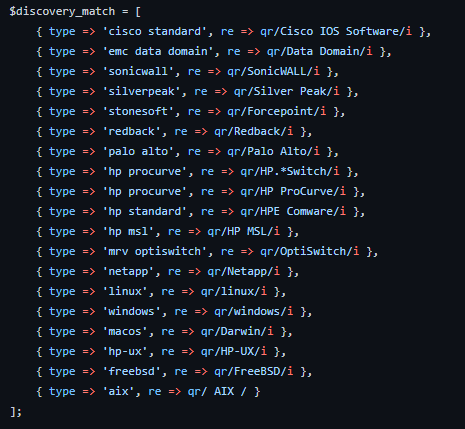
Every device containing “Palo Alto” in its sysDescr OID will be considered a Palo Alto device.
Here is an example of a CLI discovery test:
|
|
The JSON maps the sysDescr value with the ‘desc’ node and the type is simply Linux because it matches with this association:
|
|
Through the Host Discovery menu, configure a job and display the result. As you can see, the module took advantage of the returned type to propose a template association:

This association is made through the mappers configured at the job level:
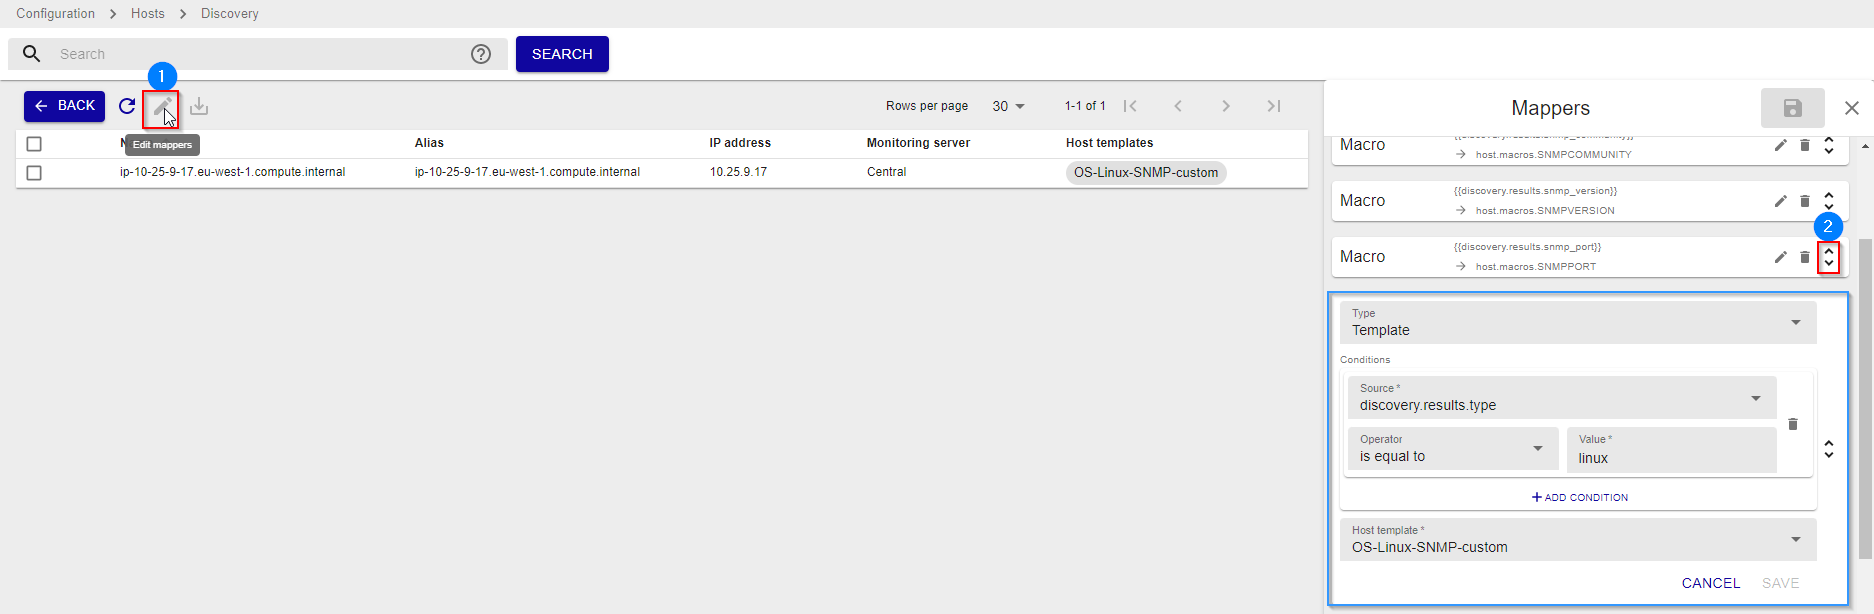
Above, you can see we use a “template” mapper with a condition stating that if the type node in the JSON is linux, then apply the ‘OS-Linux-SNMP-custom” template.
Nmap discovery
The discovery powered by Nmap is acting exactly like the SNMP ones. Then, we will focus on files and parts being essential for someone that would like to contribute to enhance the device detection process.
If you need to get more details about how to install the pack and configure a job, check out the dedicated post.
Indeed, the Nmap discovery job relies on a plugin mode. The only difference with SNMP is that the mode directly ships the mapping array:
As you can see, this is very similar to the SNMP one.
With Nmap, you can also run discovery from command-line to test execution duration or get a first overview of the result between configuring a job in the UI.
|
|
As you see, much more values are returned and every of these might be used in one or several mappers.
Possibilities are endless, you can go through the services list to build complex conditions to apply the right template or using any properties / JSON node to associate a category or a group to the discovered asset.
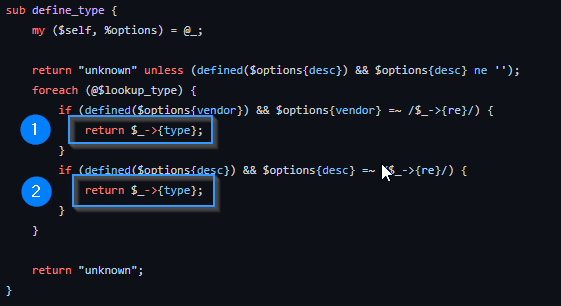
Something slightly different with Nmap is that we try to leverage two different properties, first the “vendor” (null in the example above) and then the ‘desc’ one (Linux 3.7 - 3.10 in the example above).
Type definition where both discovery attributes are used:

Logical loops showing that we return a value as soon as possible and that the vendor has priority over OS (because a lot of manufacturers ships a Linux inside their appliances).
How to contribute and help the community
No need to have advanced knowledge of Perl programming Git to help us enhance the discovery experiences we have described above.
Of course, all code from this article is open-source. In other words, if you feel like it, fork the centreon-plugins GitHub (if you haven’t already) and propose your change to add lines to discovery mappings in the relevant mode.
Scanning your network, if you notice some lines in the discovery result don’t offer a proper template or match any type predefined in the mode array, you have the opportunity to help other users!
Here is a typical example:

If you figure out what kind of device it is and what Plugin Pack should be associated with it, you have two possibilities:
- Contribute by offering a pull request on the centreon-plugins Github to add an entry in the mapping array.
- Open an issue in the same Github repository to ask us to add a new association.
In this last situation, make sure you provide the following information:
- Raw discovery data which is the JSON shown previously in the UI screenshots
- The unique type you want to add
- Optional: the Plugin or Plugin Pack that you managed to apply on this host (if any)
- Optional: a screenshot of the Mapper definition you’ve defined in the Discovery module if you configured it.
Let’s all work together to make this discovery even more complete. On our side, we already have a bunch of ideas to optimize mechanisms and make your life easier, but we need you on this one!
Any questions? Feel free to post a comment.
